


Whether you’re on a DIY budget or not, here are some ways we can update this rustic kitchen without breaking the bank:
First, let’s talk about what to do when new cabinets are not in the budget. You can totally transform the look with paint! Since the cabinets are made with a knotty wood, I would sand them down, then use a wood filler paste to fill in the wood grain and knots and then sand again to achieve a smooth factory finish. Then use a good primer (I like Zinsser B-I-N shellac primer) to prevent the oils from the wood soaking through your paint. I would use a paint sprayer for both primer and paint to get a smooth finish. The paint color I used for the mockup is Natural Cream by Benjamin Moore. For the lower cabinets, you can sand down to raw wood and stain then seal with polyurethane. Another option is to create a faux wood look with gel stain. I will link my tutorial for this process below. Building cabinet boxes above the upper cabinets and finishing with crown moulding really elevates the space- I will also link tutorials below for that.
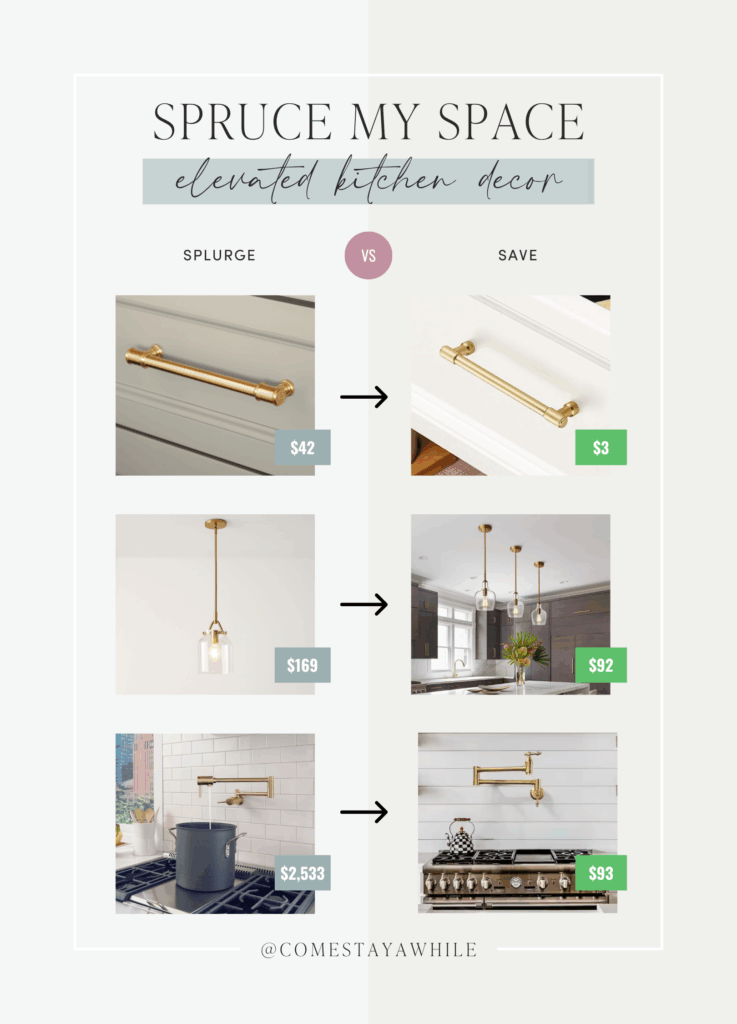
If you decide that new cabinets are worth the splurge, here are a couple options to save:
Additionally, if you can splurge on new cabinets, you can save money in other areas by DIYing things like flooring, backsplash, and plaster range hood cover.
Updating the flooring will take this room from the 90s into 2026. I recommend doing floating flooring, it’s easy to DIY, durable, scratch-proof, and waterproof. The hardest part is removing the existing tile, so if you’re wondering what would be worth splurging on– hire the demo crew then save money by installing the flooring yourself. I linked my DIY floating floor tutorial below for you, I promise it’s easier than you think!
DIY backsplash is probably the easiest thing to tackle in this space! Remove the old tile, repair the drywall, then use MusselBound tile adhesive to avoid the mess of mortar and it’s super beginner-friendly! I would choose a white/beige zelliege tile (like this one) for the backsplash to stay neutral but still add a ton of depth and texture to the space.
I know this one probably has you thinking “no way” but it’s so much easier than you think! I DIY-ed ours in 2023 and it’s still my favorite part of our kitchen, I’ll link my tutorial below– trust me, this room is BEGGING for a plaster hood. It makes everything feel so much more elegant and timeless.
In the mockup, I replaced the countertops with a white quartz which I think is a really beautiful option and would totally tie the space together. HOWEVER, I also think that with the changes we made throughout the rest of the space, the existing countertop will still tie in and look beautiful. Totally up to you and your budget to decide what works for you.
Adding gold hardware, modernized decor pieces, and swapping out the pendant lights will complete the space and make everything feel cohesive. Kitchens can feel like such an overwhelming project to tackle (trust me I’ve been there) but if you take it one step at a time and remember “home takes time” you can have the kitchen of your dreams, no matter the budget.
Make sure you’re following along on Instagram for weekly room transformation ideas! I’ve sourced both high-end and budget-friendly furniture for this space. You can shop the links below or on my Amazon and LTK storefronts. Use the link below to submit your space to be considered to be featured next week!
Every week I take photos of YOUR spaces in your homes and photoshop how I would design and decorate them! If you’d like to submit a photo of your space for a chance to be featured next, click the button below!
How to Choose the Perfect Paint Sheen
Replacing a Light Fixture: For Beginners
Kitchen Tile Backsplash Installation for Beginners
How to Create a Faux Wood Finish Using Gel Stain
How to Install Floating Flooring
How to Build Upper Cabinet Boxes
DIY Shaker Cabinet Door Tutorial